15 User Acceptance Testing Templates [Examples + Download]
During UAT, having the right processes is crucial. In this post, we offer 15 free user acceptance testing templates to copy and implement with your team.
User acceptance testing templates are documents that help QA teams plan and execute UAT testing.
The end goals are:
- to find out if end users run into any issues when testing;
- and that the software works in a real world business context.
Successfully running user acceptance tests is challenging.
That’s why having the right processes and workflows in place is crucial.
In this blog post, we offer free user acceptance testing templates you can easily copy and implement with your team.
Whether your organization uses Jira, GitHub, Trello, GitLab, or Asana, or keeps a backlog in an Excel spreadsheet, in a Word document, or via email—we’ve got you covered.
You’ll need the following:
- A UAT test plan template. This document outlines business requirements, testing team, and assignments, as well as the testing process and strategy to be used during UAT execution.
- A test case template. These are real world scenarios and step-by-step instructions on how to test a specific feature within a software or website app.
Find what works for you in this list:
Test case templates:
- In GitHub
- In Jira
- In Trello
- In GitLab
- In Asana
- In Teamwork
- In Shortcut
- In Monday
- In ClickUp
- In Wrike
- In Excel
- In Word
- As PDF
- In Email
User Acceptance Testing Templates
User acceptance testing (UAT) is performed at the later stages of the software development lifecycle, in a production or (production-like) environment.
Often, this means UAT testing is poorly planned.
The final release is riddled with critical bugs and defects that end up costing companies extra hours of development.
You can avoid this with a good user acceptance testing template.
This list contains everything you need to ensure you meet acceptance criteria.
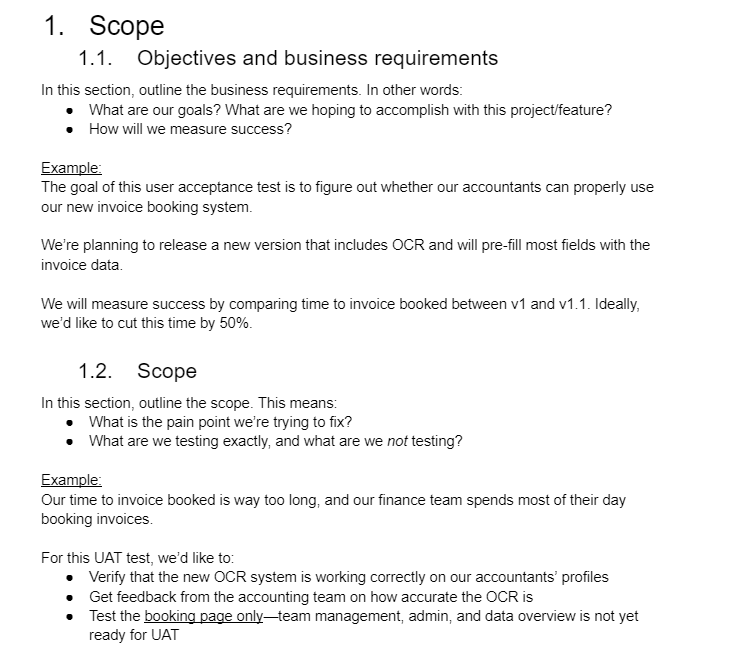
This user acceptance testing template is your one source of truth for UAT planning.
It contains:
- Scope, business requirements, and objectives. Why are we building this new feature? What’s the pain point/main functionality? What are technical objectives?
- Test team. Every individual on the QA team is assigned a responsibility—the who, the what, and the when.
- Milestones and deliverables. Every phase of acceptance testing is documented here: testing process design, staging environment, training, execution, and report on test results.
- Environmental requirements. Hardware (in some cases) and software requirements are listed here.
- Features to be tested. What are we expecting to discover during testing? What are the pass/fail criteria for each feature? What features do we want to avoid testing? What should our test cases look like?
This document is 100% editable—simply fill in the blanks with your own data.
Here’s a sneak peek:
You can download the full test plan in this Google Doc.
Remember to create a copy first, or you won’t be able to edit it with your own data!
UAT Test Case Templates
During user acceptance testing (UAT), test cases are real world scenarios performed by the end user.
The goal here is to write step-by-step instructions that lead testers to the desired result.
But you also want to ensure your app is self-explanatory enough—in other words, you can’t “hold their hand” through the entire process.
For example:
- Log on to the app on staging.acme.com.
vs.
- Go to staging.acme.com, then click the blue “log on” button in the top right of the screen.
The first example here is far better: it’s clear what the desired result is, yet it allows:
- testers to figure out how to get there by themselves;
- the QA team to identify any friction in the process, which is the whole point of UAT testing.
Here’s what you should include in UAT test cases:
- ID or Name. A unique identifier or a descriptive name that’s easy to come back to.
- Description. Insert what needs to be tested—don’t go into too much detail.
- Test steps. Keep it brief but make it clear what the end goal is.
- Expected result. Tell the end user what is supposed to happen once they have completed the steps above. Example: you should now be logged on to the dashboard.
- Actual result. This field is filled by testers and describes what actually happened. Example: the dashboard is loading indefinitely.
- Status (Pass/Fail). Whether the task was successfully completed or not. This is typically a radio button.
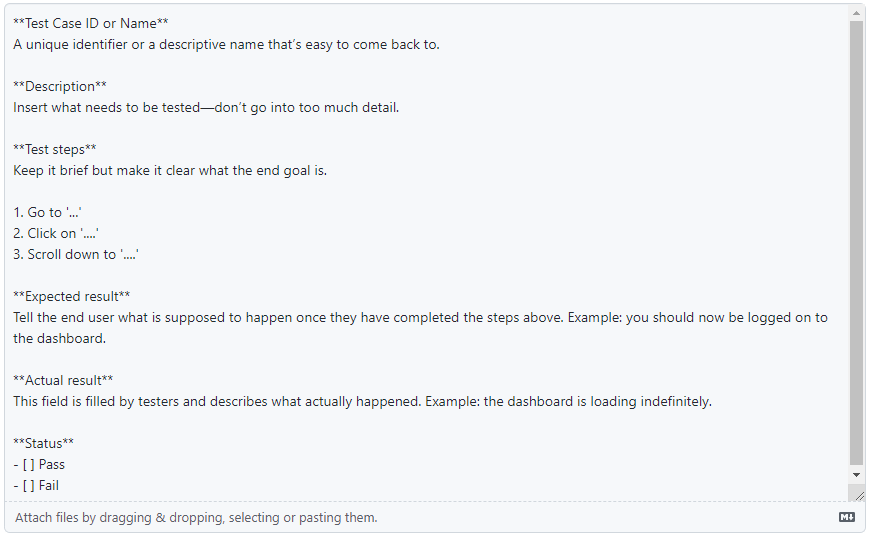
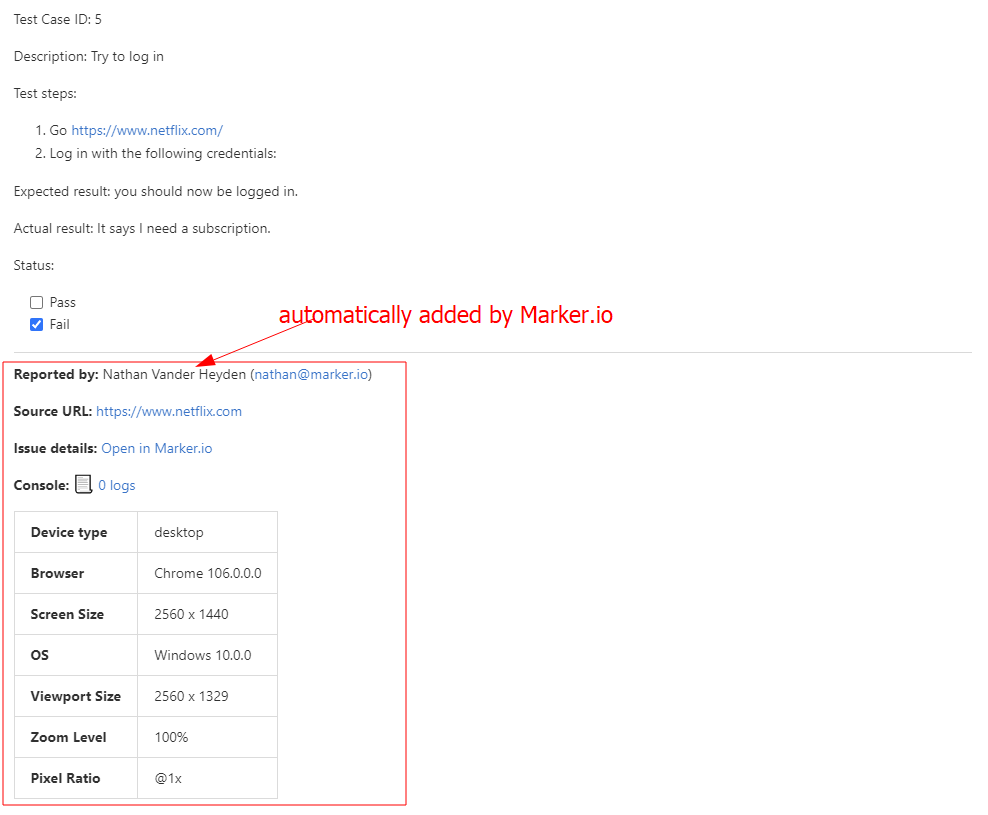
If your team uses GitHub, you can use the following format during user acceptance testing (UAT):
As you can see, this issue contains all the basic fields you need to successfully execute UAT, including:
- ID
- Description
- Test steps
- Expected result
- Actual result
- Status
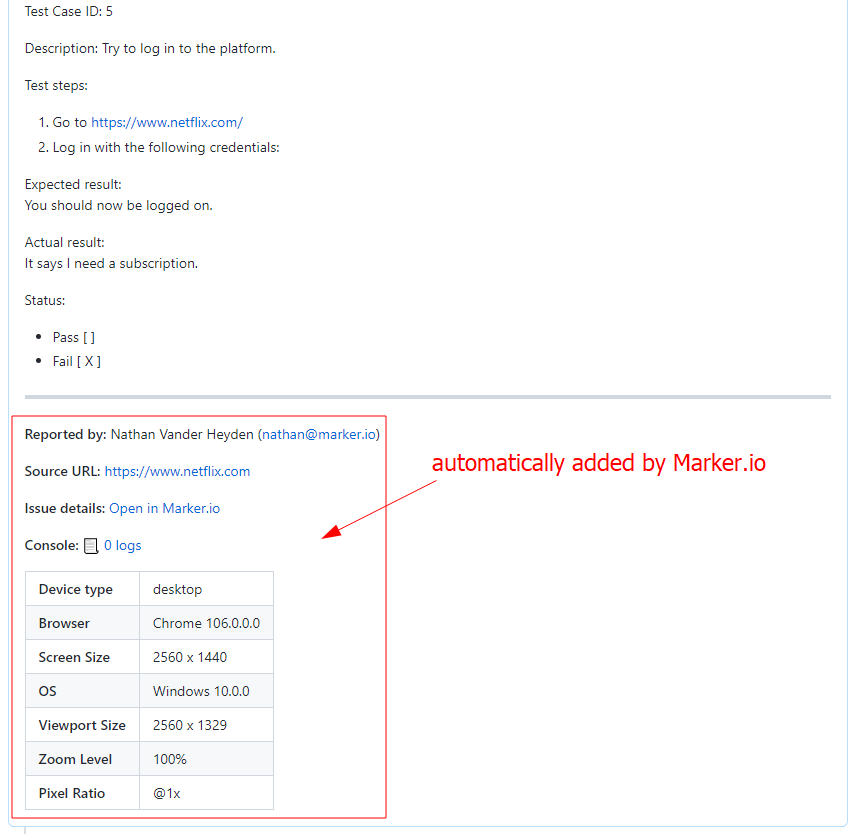
And if you use Marker.io for GitHub, the following info will be collected automatically:
Because UAT involves non-technical users by definition, it makes sense to collect this data—it would otherwise be lost or incorrectly reported.
This includes:
- Reporter name
- Source URL
- Screenshot
- Console logs and session replay
- Environment info (device type, browser, screen size, OS…)
Whenever the end user spots a problem on your website or app, they can take a screenshot with Marker.io, and add annotations to get their point across.
In just one click, the tool converts it into a new GitHub issue.
If your team is on GitHub, consider signing up for a free Marker.io trial.
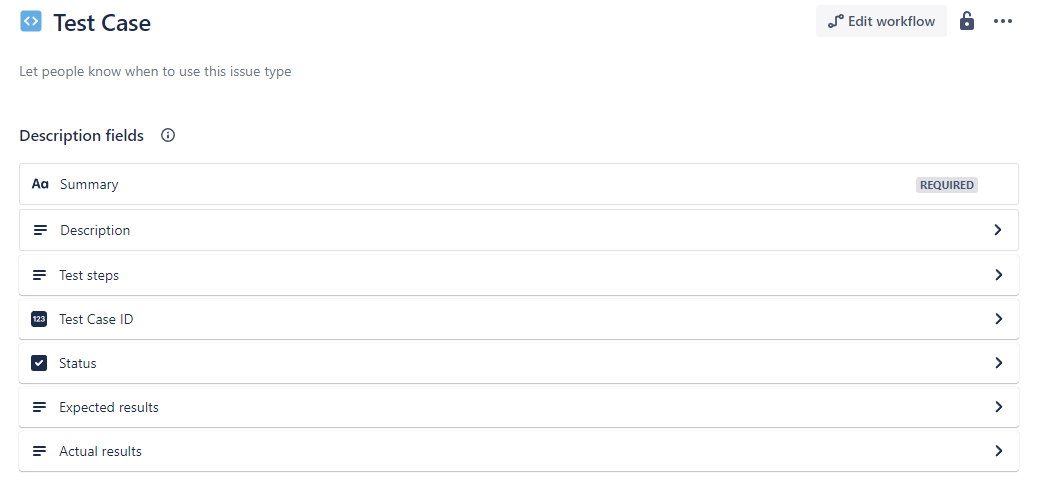
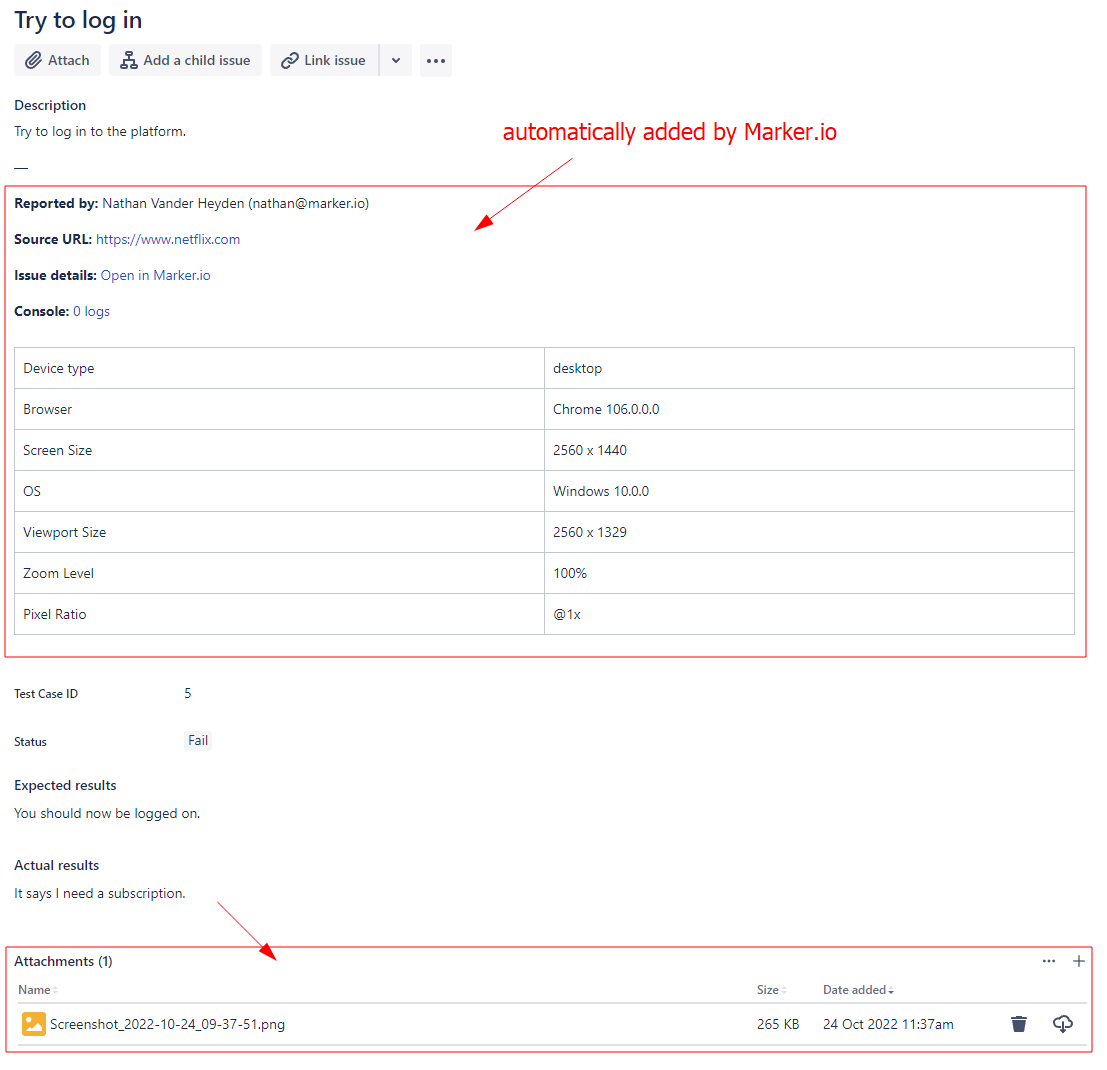
If your team is on Jira, you can use the following user acceptance testing template.
As you can see, this issue type contains all the basic fields you need to successfully conduct user acceptance testing, including:
- ID
- Description
- Test steps
- Expected result
- Actual result
- Status
And if you use Marker.io for Jira, the following info is added automatically:
Because UAT involves non-technical users by definition, it makes sense to collect this data—it would otherwise be lost or incorrectly reported.
This includes:
- Reporter name
- Source URL
- Screenshot
- Console logs and session replay
- Environment info (device type, browser, screen size, OS…)
Whenever the end user spots a problem on your website or app, they can take a screenshot with Marker.io, and add annotations to get their point across.
In just one click, the tool converts it into a new Jira issue.
If you need help set up custom issue types and test cases in Jira, check out our guide on how to write test cases in Jira.
If your team is on Jira, consider signing up for a free Marker.io trial.
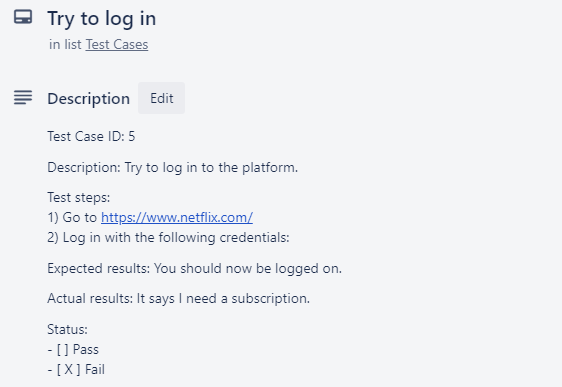
If Trello is your PM tool of choice, you can use the following for your test cases:
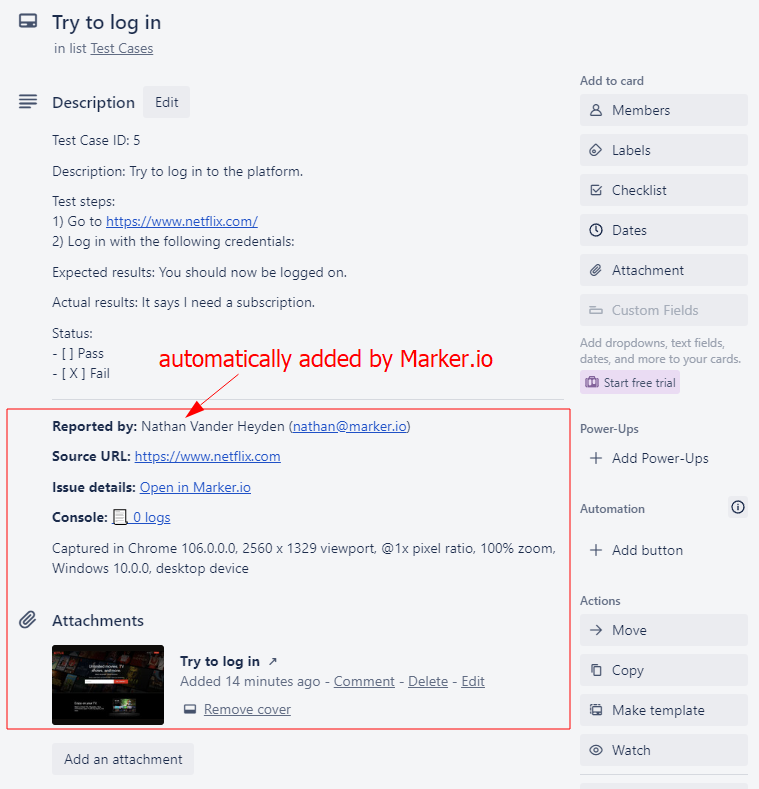
As you can see, this card contains all the basic fields you need for UAT testing, including:
- ID
- Description
- Test steps
- Expected result
- Actual result
- Status
And if you use Marker.io for Trello, the following info is added automatically:
Because UAT involves non-technical users by definition, it makes sense to collect this data—it would otherwise be lost or incorrectly reported.
This includes:
- Reporter name
- Source URL
- Screenshot
- Console logs and session replay
- Environment info (device type, browser, screen size, OS…)
Whenever the end user spots a problem on your website or app, they can take a screenshot with Marker.io, and add annotations to get their point across.
In just one click, the tool converts it into a new Trello card.
If your team is on Trello, consider signing up for a free Marker.io trial.
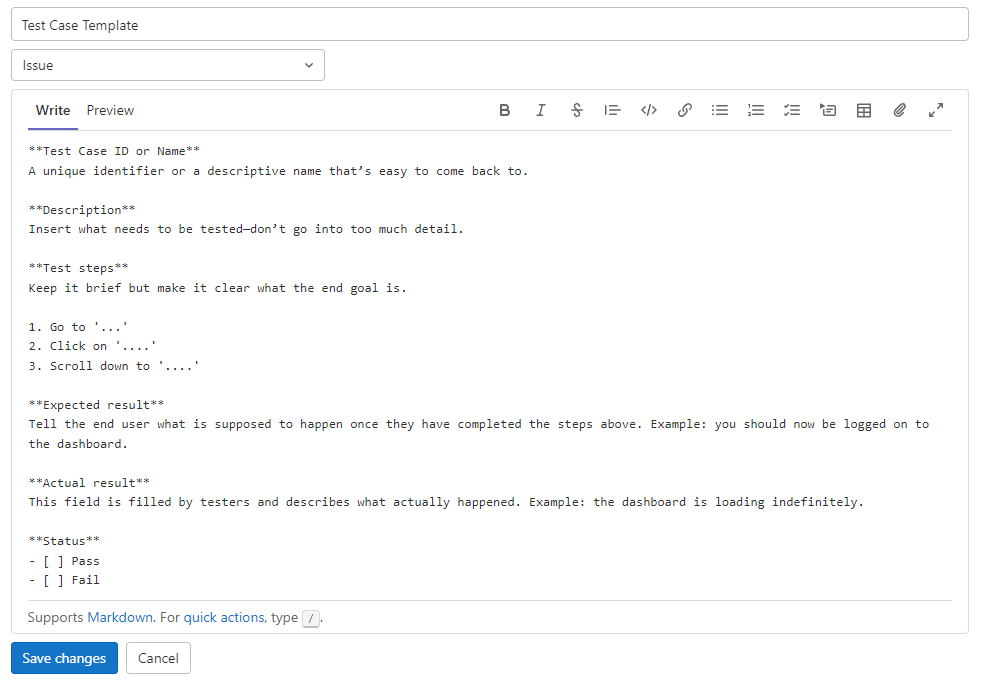
If you use GitLab for your test scenarios, you can use this markdown-style format:
As you can see, this issue contains all the basic fields you need for user acceptance testing, including:
- ID
- Description
- Test steps
- Expected result
- Actual result
- Status
And if you use Marker.io for GitLab, the following info is added automatically:
Because your test cases will involve non-technical users, it makes sense to collect this data—it would otherwise be lost or incorrectly reported.
This includes:
- End user name
- Source URL
- Screenshot
- Console logs and session replay
- Environment info (device type, browser, screen size, OS…)
Whenever the end user spots a problem on your website or app, they can take a screenshot with Marker.io, and add annotations to get their point across.
In just one click, the tool converts it into a new GitLab issue.
If your team is on GitLab, consider signing up for a free Marker.io trial.
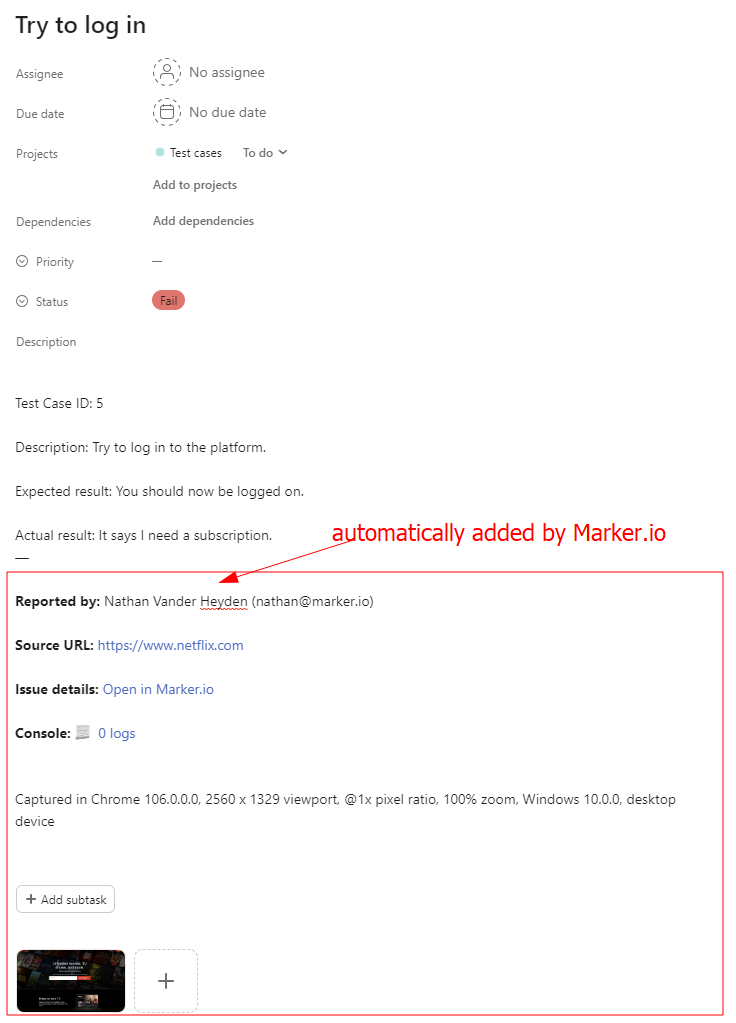
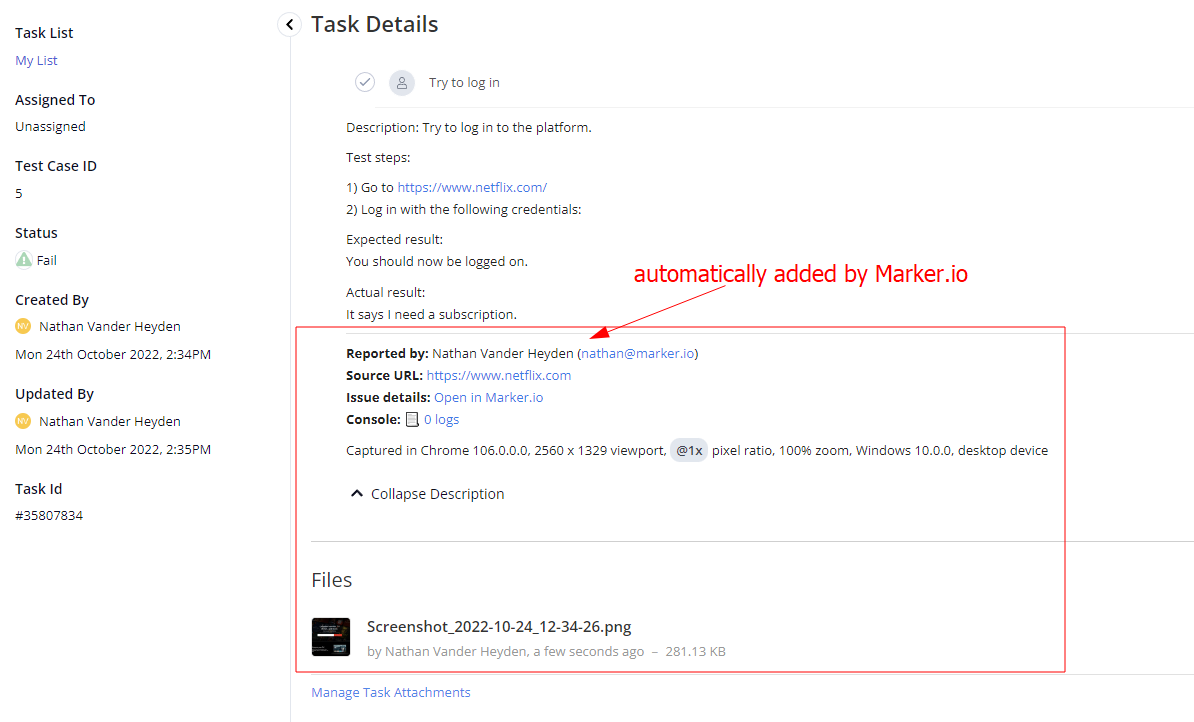
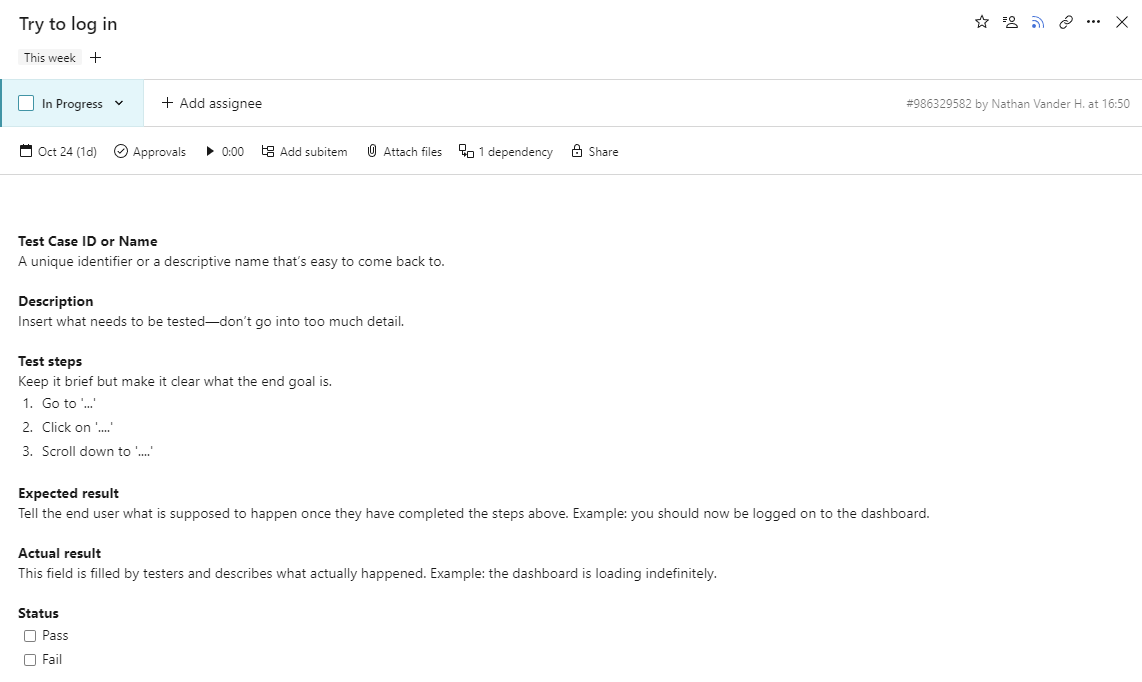
If you use Asana for user acceptance testing (UAT), you can use this for your test cases:
As you can see, this task contains all the basic fields you need for your test scenarios, including:
- ID
- Description
- Test steps
- Expected result
- Actual result
- Status
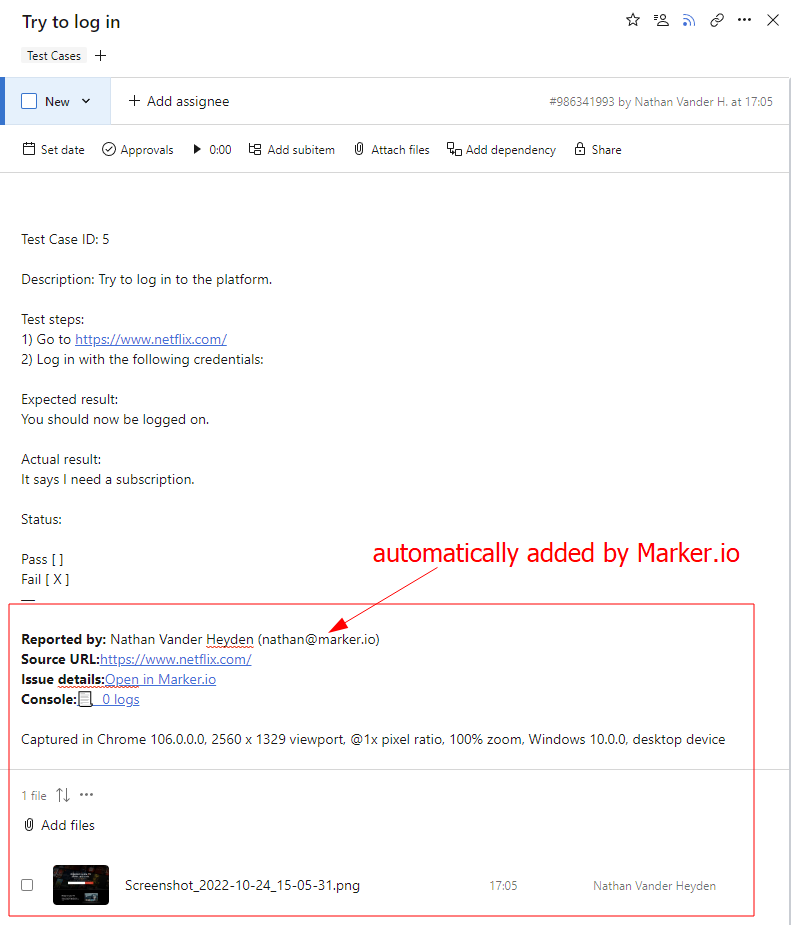
And if you use Marker.io for Asana, the following info is added automatically:
Because user acceptance testing involves non-technical end users, it makes sense to collect this data—it would otherwise be lost or incorrectly reported.
This includes:
- Reporter name
- Source URL
- Screenshot
- Console logs and session replay
- Environment info (device type, browser, screen size, OS…)
Whenever end users spot a problem on your website or app, they can take a screenshot with Marker.io, and add annotations to get their point across.
In just one click, the tool converts it into a new Asana task.
If your team is on Asana, consider signing up for a free Marker.io trial.
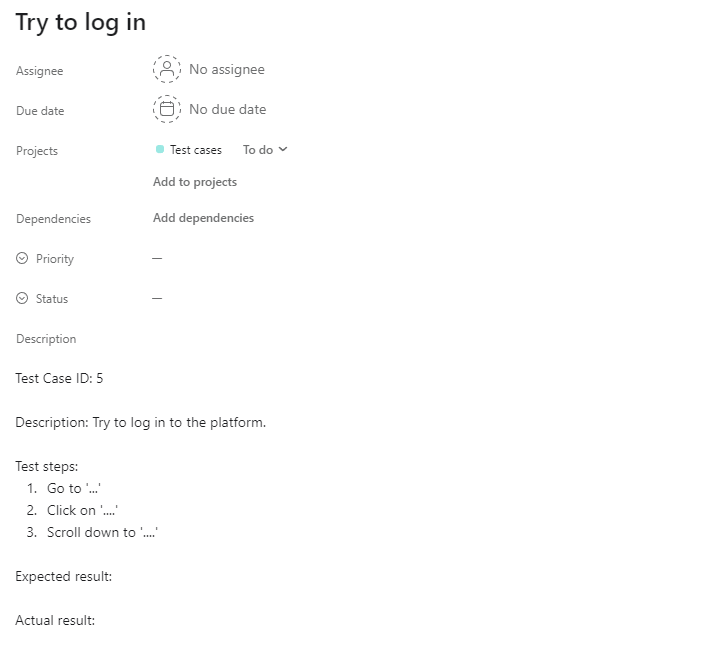
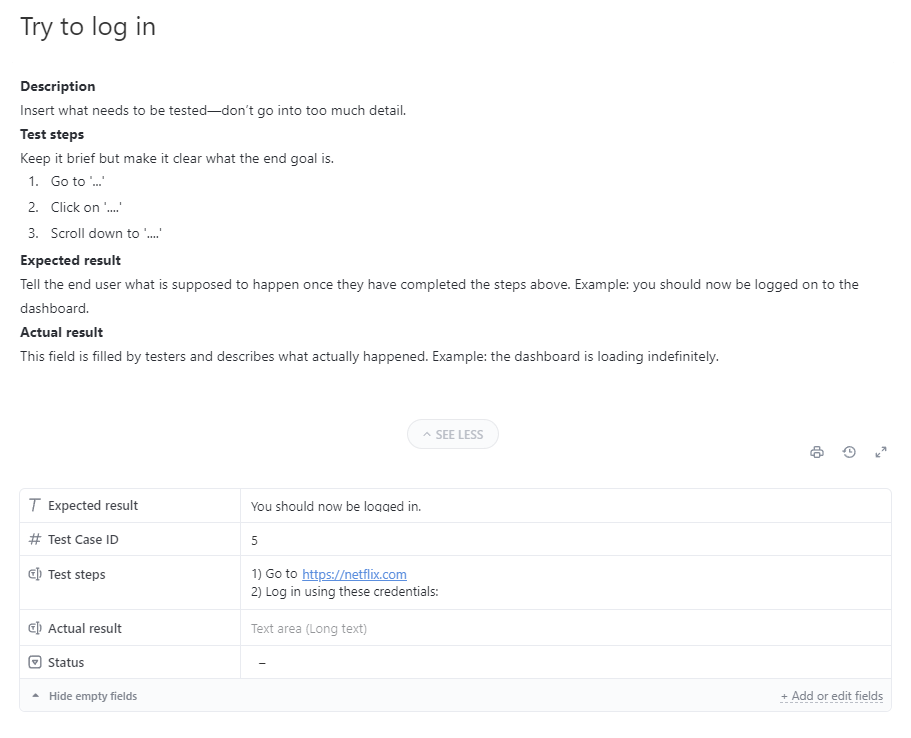
If you use Teamwork to gather feedback during your test cases, you can use this task format:
Don’t forget to add custom fields for ID and Status.
Then, your task will contain all the basic fields you need for UAT testing, including:
- ID
- Description
- Test steps
- Expected result
- Actual result
- Status
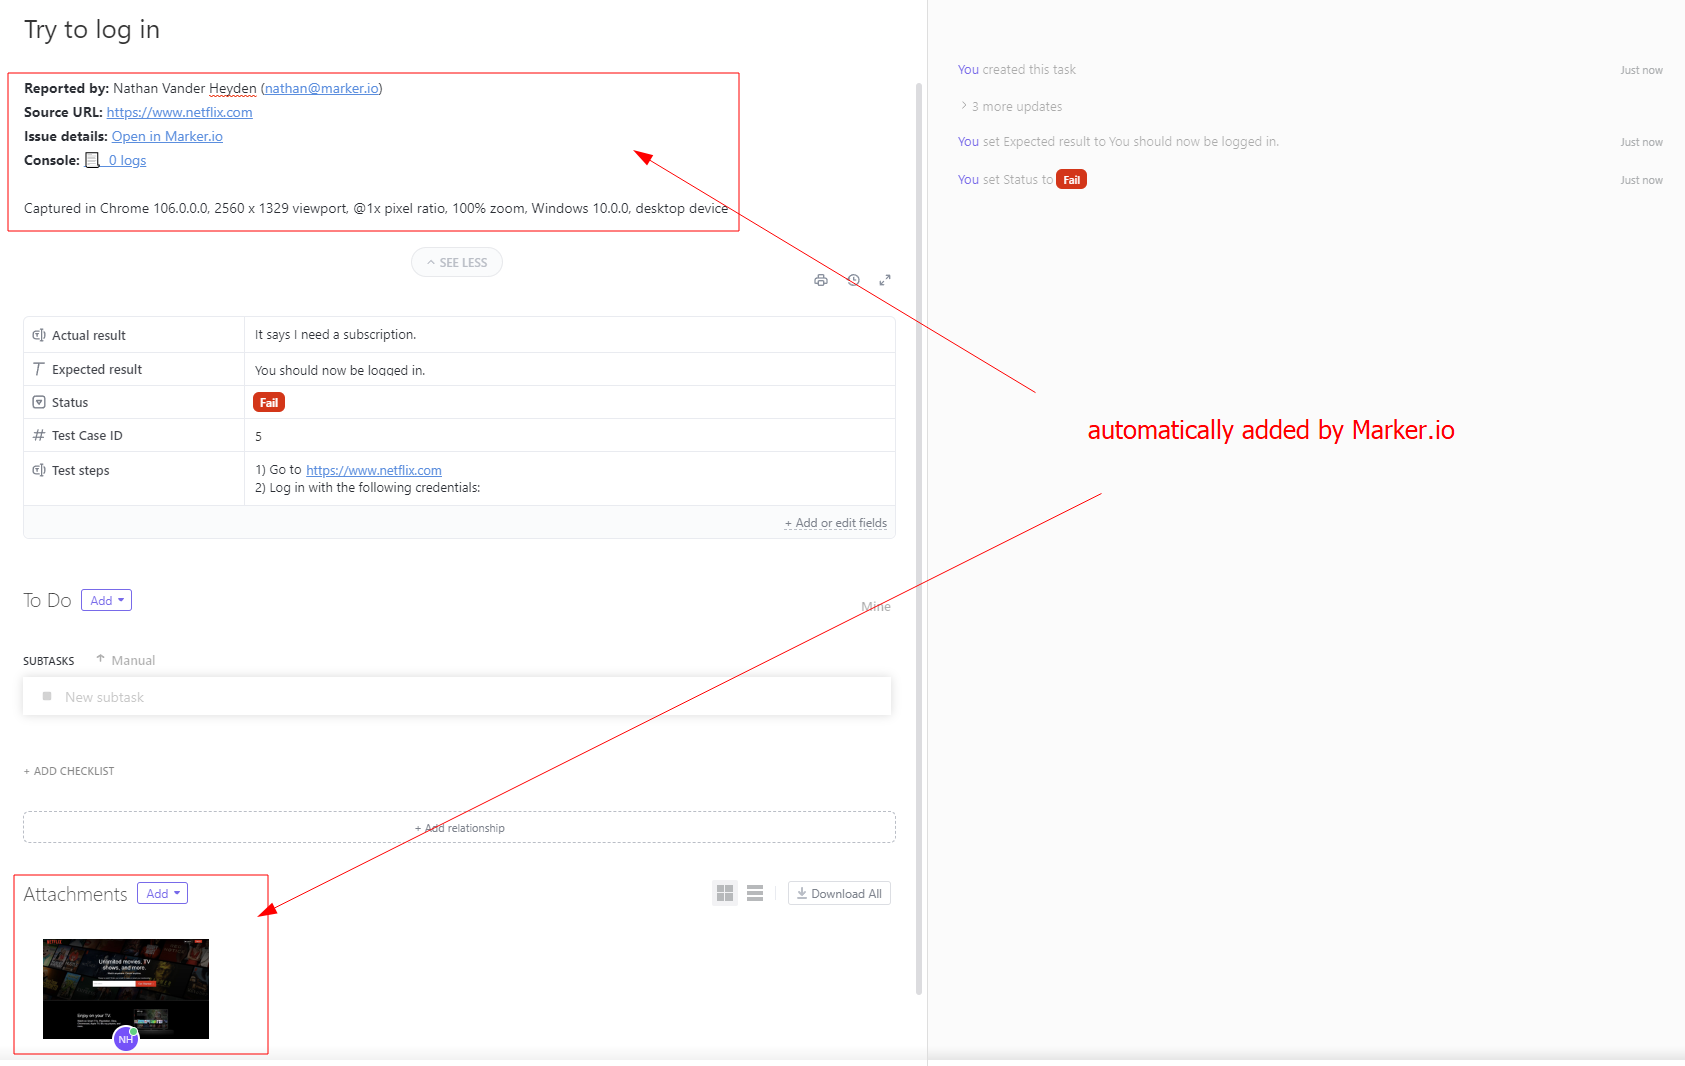
And if you use Marker.io for Teamwork, the following info is added automatically:
Because your test cases will involve non-technical end users, it makes sense to collect this data—it would otherwise be lost or incorrectly reported.
This includes:
- End user name
- Source URL
- Screenshot
- Console logs and session replay
- Environment info (device type, browser, screen size, OS…)
Whenever the user spots a problem on your website or app, they can take a screenshot with Marker.io, and add annotations to get their point across.
In just one click, the tool converts it into a new Teamwork task.
If your team is on Teamwork, consider signing up for a free Marker.io trial.
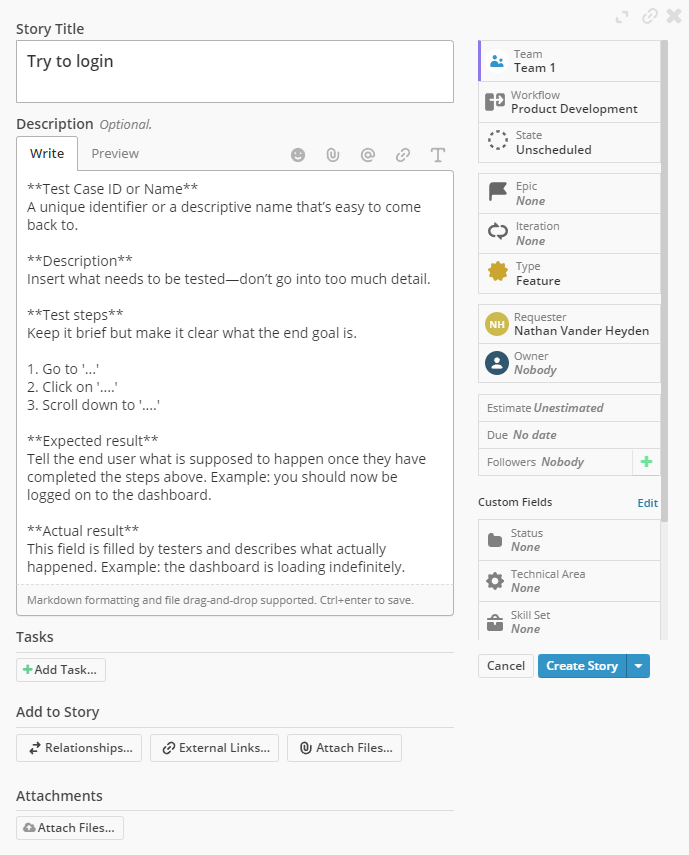
If Shortcut is your go-to project management tool, you can use this markdown format for your test scenarios:
Don’t forget to create a custom Status field with Pass and Fail as values.
Then, your task will contain all the basic fields you need for user acceptance testing (UAT), including:
- ID
- Description
- Test steps
- Expected result
- Actual result
- Status
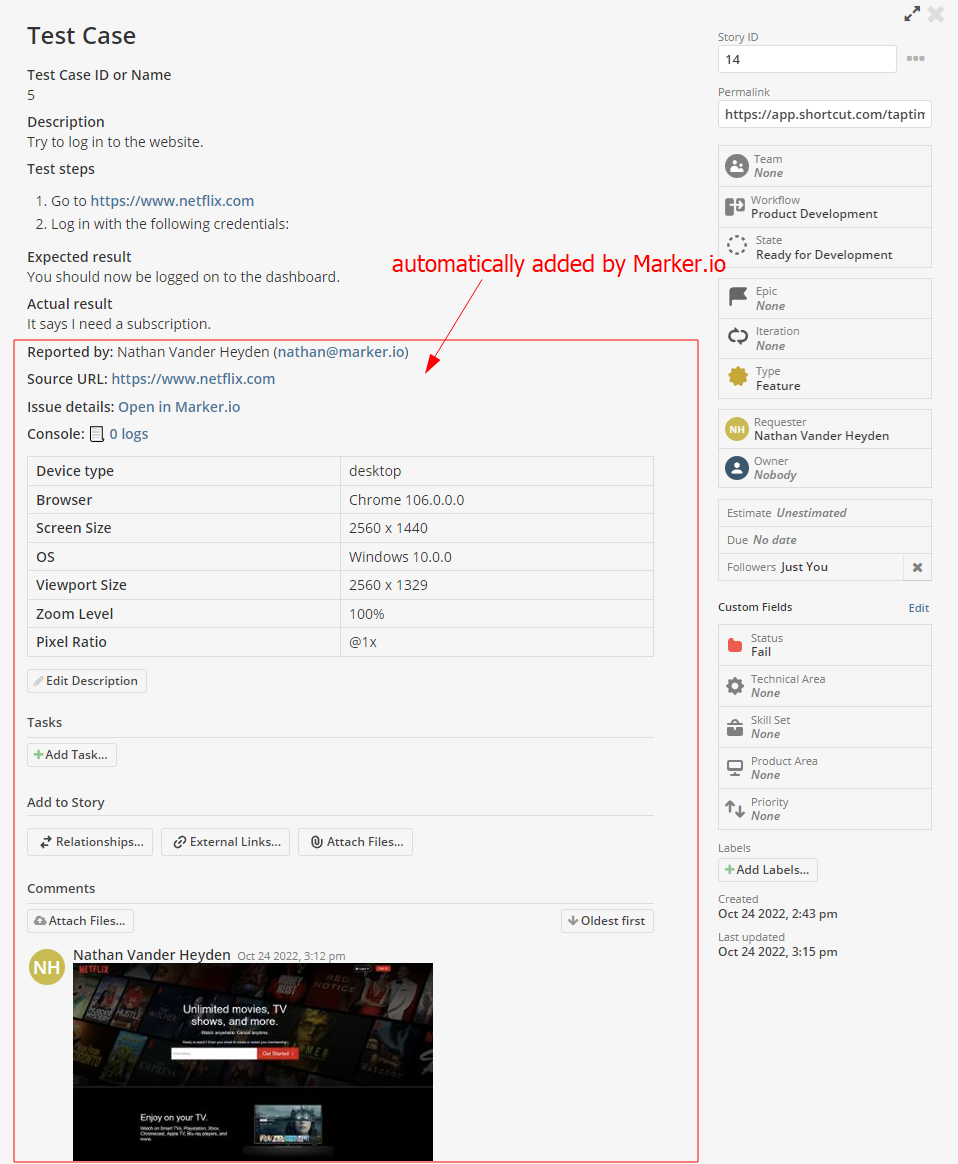
And if you use Marker.io for Shortcut, the following info is added automatically:
Because user acceptance testing involves non-technical users by definition, it makes sense to collect this data—it would otherwise be lost or incorrectly reported.
This includes:
- Reporter name
- Source URL
- Screenshot
- Console logs and session replay
- Environment info (device type, browser, screen size, OS…)
Whenever the user spots a problem on your website or app, they can take a screenshot with Marker.io, and add annotations to get their point across.
In just one click, the tool converts it into a new Shortcut story.
If your team is on Shortcut, consider signing up for a free Marker.io trial.
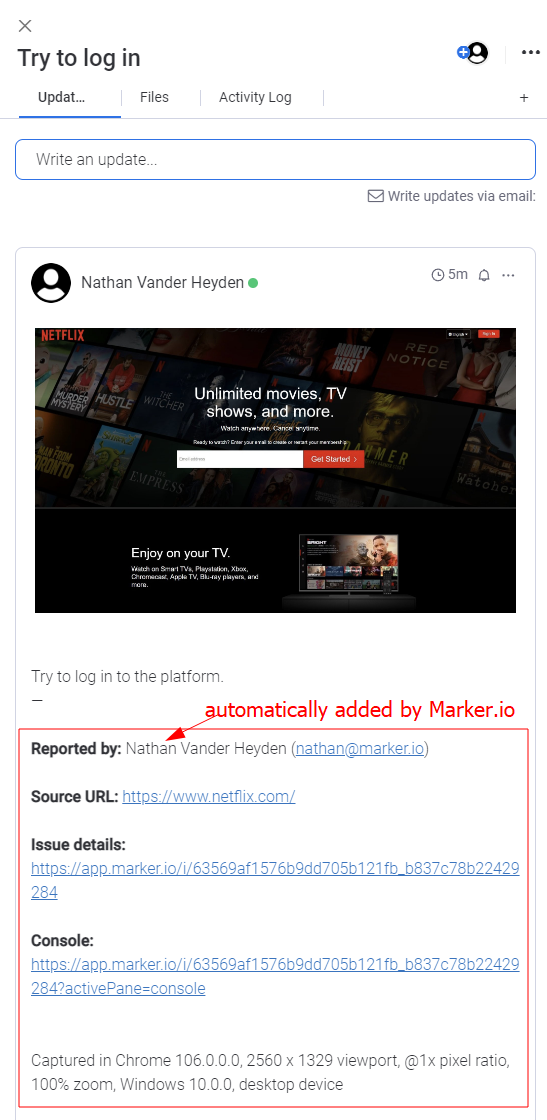
If you’re using Monday for user acceptance testing, you can use this format for your test cases:
As you can see, this task contains all the basic fields you need for UAT testing , including:
- ID
- Description
- Test steps
- Expected result
- Actual result
- Status
And if you use Marker.io for Monday, the following info is added automatically:
Because your test scenarios will involve non-technical users by definition, it makes sense to collect this data—it would otherwise be lost or incorrectly reported.
This includes:
- End user name
- Source URL
- Screenshot
- Console logs and session replay
- Environment info (device type, browser, screen size, OS…)
Whenever the user spots a problem on your website or app, they can take a screenshot with Marker.io, and add annotations to get their point across with every report.
In just one click, the tool converts it into a new Monday task.
If your team is on Monday, consider signing up for a free Marker.io trial.
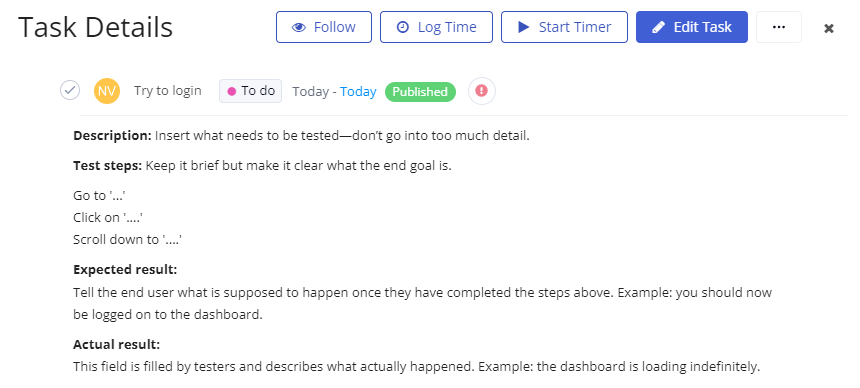
If ClickUp is your tool of choice for user acceptance testing, you can use this for your test cases:
As you can see, this task contains all the basic fields you need for your test scenarios, including:
- ID
- Description
- Test steps
- Expected result
- Actual result
- Status
And if you use Marker.io for ClickUp, the following info is added automatically:
Because UAT testing will involve non-technical users by definition, it makes sense to collect this data—it would otherwise be lost or incorrectly reported.
This includes:
- User name
- Source URL
- Screenshot
- Console logs and session replay
- Environment info (device type, browser, screen size, OS…)
Whenever the user spots a problem on your website or app, they can take a screenshot with Marker.io, and add annotations to get their point across with every report.
In just one click, the tool converts it into a new ClickUp task.
If your team is on ClickUp, consider signing up for a free Marker.io trial.
If you use Wrike for user acceptance testing, you can use this format for your test cases:
As you can see, this task contains all the basic fields you need for UAT testing, including:
- ID
- Description
- Test steps
- Expected result
- Actual result
- Status
And if you use Marker.io for Wrike, the following info is added automatically:
Because UAT testing will involves non-technical users by definition, it makes sense to collect this data—it would otherwise be lost or incorrectly reported.
This includes:
- User name
- Source URL
- Screenshot
- Console logs and session replay
- Environment info (device type, browser, screen size, OS…)
Whenever the user spots a problem on your website or app, they can take a screenshot with Marker.io, and add annotations to get their point across with every report.
In just one click, the tool converts it into a new Wrike task.
If your team is on Wrike, consider signing up for a free Marker.io trial.
If you’re old-fashioned and love Excel (.xls) or Google Spreadsheets to conduct UAT testing, you can use this format:
As you can see, this sheet contains all the basic fields you need for UAT testing, including:
- ID
- Description
- Test steps
- Expected result
- Actual result
- Status
Download these files here:
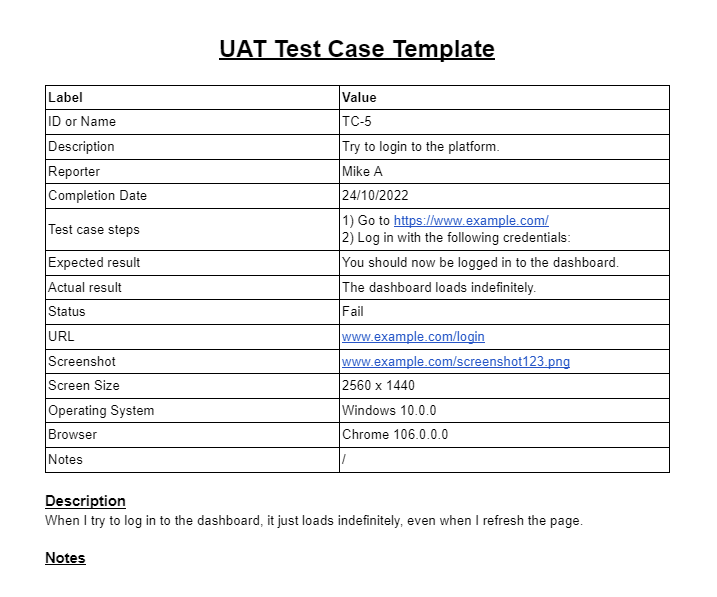
Microsoft Word and Google Docs are still used extensively for productive work.
If that’s your jam for UAT testing, we’ve got you covered:
As you can see, this document contains all the basic fields you need for user acceptance testing, including:
- ID
- Description
- Test steps
- Expected result
- Actual result
- Status
Download these files here:
If your testers will report via a PDF file, you can use a format similar to the previous MS Word document option.
PDFs are not very flexible, however, it might be a requirement to use them inside your organization.
If that’s your case, I’ve prepared the document from above in a PDF file for you to download here.
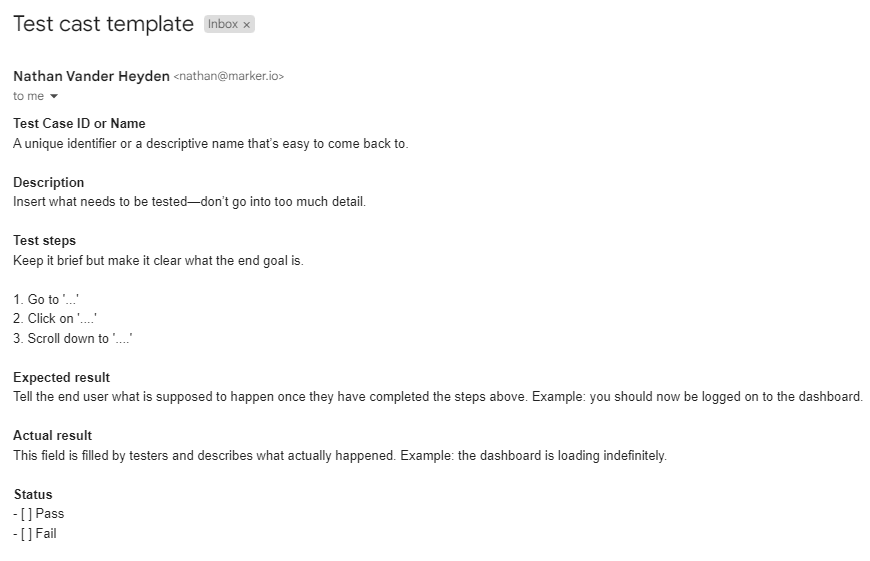
While we do not recommend using email for user acceptance testing, it may be your only option—if that’s the case, you can use this format:
This email contains all the basic fields for user acceptance testing, including:
- ID
- Description
- Test steps
- Expected result
- Actual result
- Status
You can download the email file as a .txt here.
Wrapping up...
User acceptance testing is often a challenging task, for both the testers and the QA team aiming for a bug-free release.
It’s crucial to have a solid strategy in place and to ensure everything is tested thoroughly during alpha testing and beta testing.
For successful UAT execution, you’ll need:
- A UAT test plan;
- Solid UAT testing tools;
- and a UAT test case template, depending on the tools you use to conduct UAT.
We hope the examples provided in this post have helped you find the perfect user acceptance testing template.
Questions or feedback? Let us know on Twitter or via e-mail!
What should I do now?
Here are three ways you can continue your journey towards delivering bug-free websites:
Schedule a demo with us to see Marker.io in action. We’ll personalize the session to your needs and answer any questions.
Read Next-Gen QA: How Companies Can Save Up To $125,000 A Year by adopting better bug reporting and resolution practices (no e-mail required).
Follow us on LinkedIn, YouTube, and X (Twitter) for bite-sized insights on all things QA testing, software development, bug resolution, and more.
Frequently Asked Questions
What is Marker.io?
Who is Marker.io for?
It’s perfect for agencies and software development teams who need to collect client and internal feedback during development, or user feedback on live websites.
How easy is it to set up?
Embed a few lines of code on your website and start collecting client feedback with screenshots, annotations & advanced technical meta-data! We also have a no-code WordPress plugin and a browser extension.
Will Marker.io slow down my website?
No, it won't.
The Marker.io script is engineered to run entirely in the background and should never cause your site to perform slowly.
Do clients need an account to send feedback?
No, anyone can submit feedback and send comments without an account.
How much does it cost?
Plans start as low as $49/mo per month. Each plan comes with a 15-day free trial. For more information, check out the pricing page.
Get started now
Free 15-day trial • No credit card required • Cancel anytime






![How to Write a Good Bug Report [Step-By-Step Guide]](https://cdn.prod.website-files.com/671900dacbf828ea7d4ce0c4/671cc18e0f6b41c5c48160d4_64380d0eb677f0c6c24e62ae_how-to-write-bug-report.webp)